User Guide for Enrolling Individuals for the Securities Industry Essentials (SIE) Exam (Non-Form U4)
The Securities Industry EssentialsSM (SIESM or Essentials) Exam, available beginning October 1, 2018, is a FINRA exam for prospective securities industry professionals. Any individual age 18 or older is permitted to take the SIE exam without the need for a
filing.
This user guide is intended to assist firms in navigating through the enrollment process.
On This Page
Access and Entitlement
Users with Form U4 filing entitlement will have access to the SIE section on the Web CRD home page and can enroll individuals to take the SIE exam by selecting the SIE Enrollments/Results link on the Web CRD system (Figure 1). Users with View Individual entitlement can view the SIE enrollments paid for by the firm but are restricted from enrolling individuals. If you do not have the appropriate entitlement, please consult your firm’s Super Account Administrator.
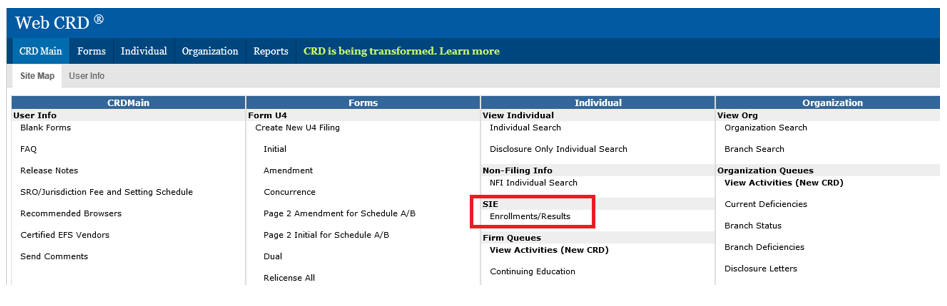
Figure 1
Enrollment Options
There are three options for enrolling an individual to take the SIE:
- Create a file with individual enrollment information and upload via the Upload List feature;
- Enter the individual enrollment information via Manually Add feature; or,
- Provide an individual with a voucher code so they can self-enroll.
Eligibility Criteria
In order for an individual to be eligible to take the SIE, the following criteria must be met:
- The individual must be at least 18 years of age.
- The CRD number, if provided, must match the enrollment information (Social Security Number or Last Name + Date of Birth) of the individual.
- The individual must not have an Exam Validity status of "Valid" or "Valid until MM/DD/YYYY" for the SIE exam in the exam history page of CRD. Please review the FINRA Exam Restructuring page's "Credit for SIE" section.
- The individual must not have passed SIE in the past four years.
- The individual must not have another open SIE enrollment.
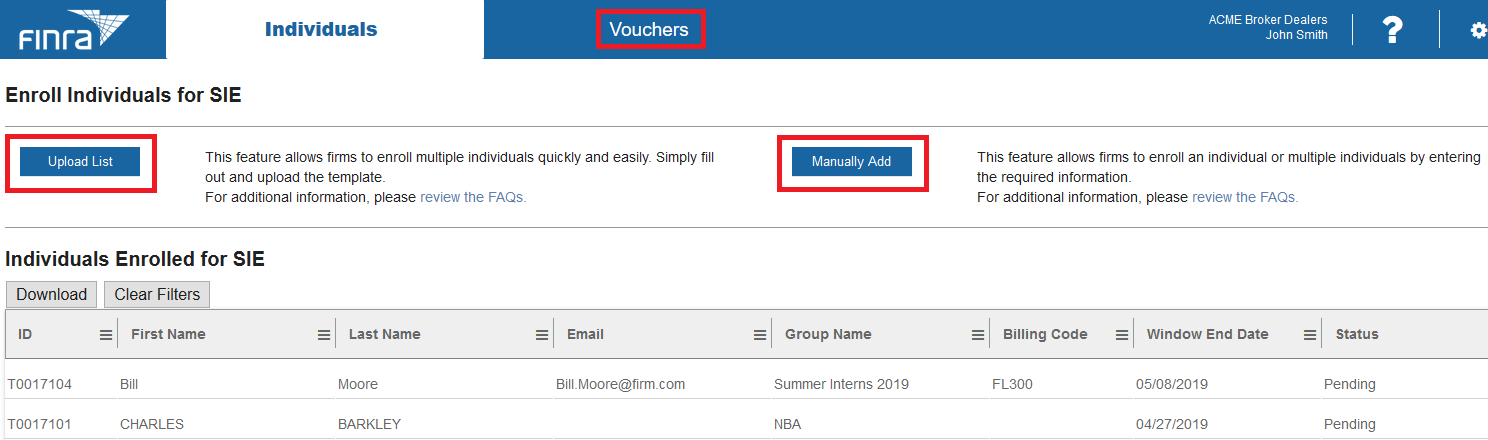
Enroll Individuals via Upload List Feature
The Upload List feature allows you to enroll up to 100 individuals by providing the Required Enrollment Information for each individual. The following step-by-step process will guide you through this process.
Step 1: Select the Individuals Tab
At the top of the screen shown in Figure 2, select the "Individuals" tab to access and perform individual-related functions.

Figure 2
Step 2: Select Upload List
Selecting the Upload List takes you to the page (Figure 3) where you can upload a CSV file with Required Enrollment Information.
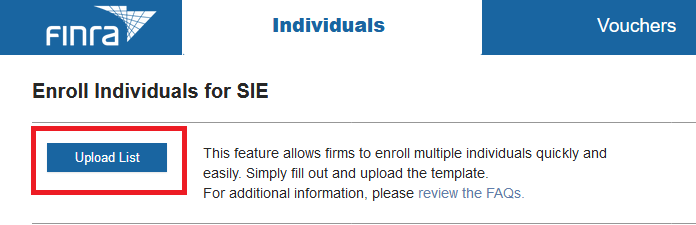
Figure 3
Step 3: Download the Template
As shown on the top right side of Figure 4, FINRA provides you with an Excel and a Comma Separated Values (CSV) template. The Excel template contains macros that help minimize the errors by validating each entry to ensure that the format is correct and all required values are inputted correctly. The Excel spreadsheet also allows your data to be exported into the CSV format that you will upload into the system. Alternatively, you can just complete and upload the CSV file.
User Tip: Please give the CSV file a descriptive name and store it in an easily accessible and identifiable location that meets your firm’s information security requirements regarding data containing personally identifiable information of individuals and sensitive information.
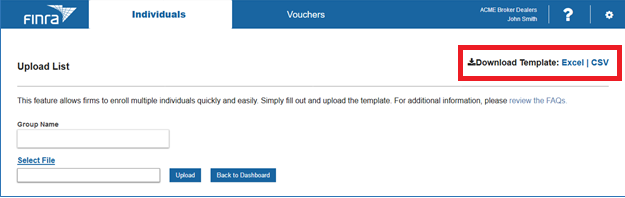
Figure 4
Step 4: Update Template with Individual Information
Open the CSV file or the Excel spreadsheet with the appropriate application on your computer. Typically, Microsoft Excel can be used for this purpose. If you do not have Excel installed on your computer, download the CSV and open it with a simple text editor. Figure 5 shows a sample completed spreadsheet.
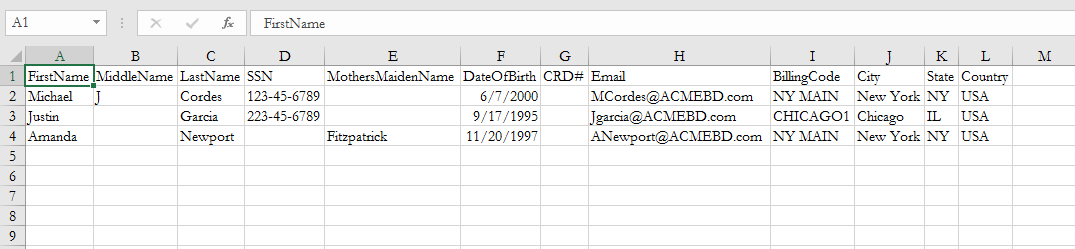
Figure 5
If you are using the Excel template, make sure you select the Generate CSV File button after you enter the individual enrollment information. This will generate the CSV file in the format that is accepted by our system (Figure 6). Note that the system will not accept the Excel spreadsheet; only CSV files are accepted.
User Tip: The Billing Code is an optional field that firms can use as applicable to support their firm’s internal work processes (e.g., to assign charges to the enrollee’s appropriate cost center).
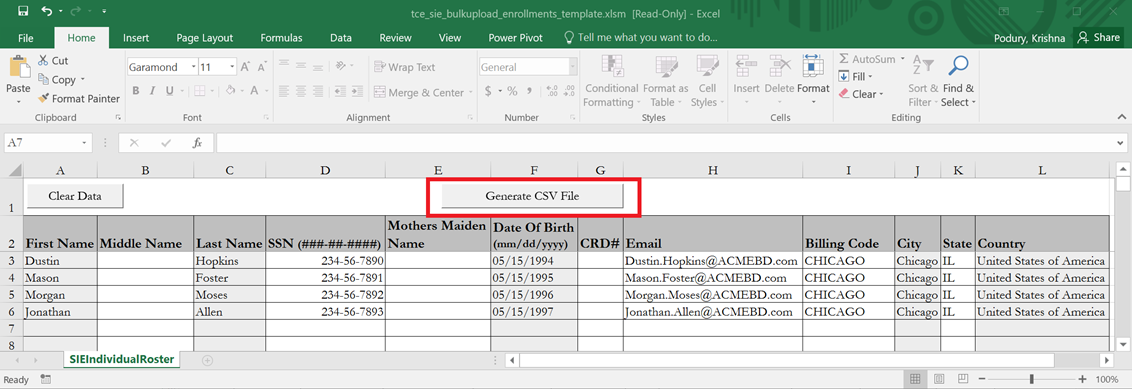
Figure 6
Step 5: Upload the CSV
Once the CSV file is populated with all the required information, click on Select File as shown in Figure 7. This will open a pop-up window that will be used to select the file you just created. As stated above, note that the system only accepts a CSV file.
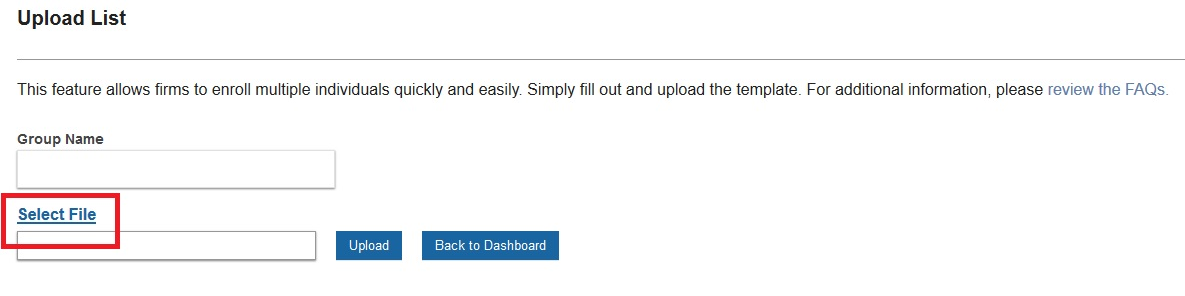
Figure 7
Navigate to the location of the CSV file that you created, select the file and click the Open button as shown in Figure 8.
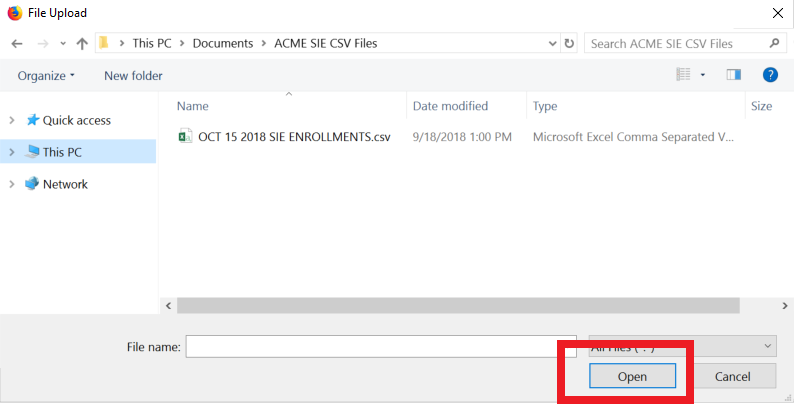
Figure 8
Once you click the Open button, the screen will update to display your file name as shown in Figure 9.
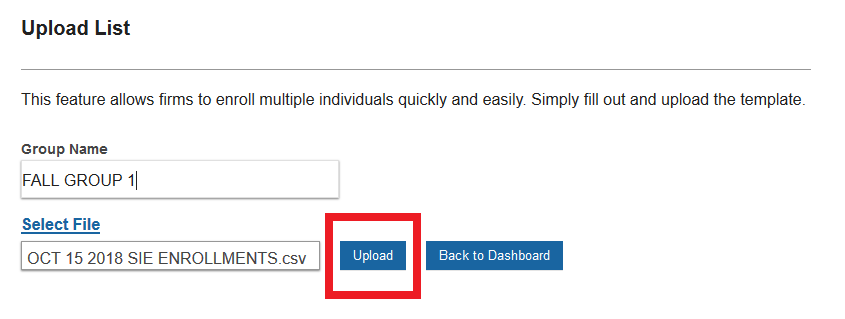
Figure 9
Type in a Group Name and click the Upload button. This will upload the information from the CSV file and creates SIE enrollments for the individuals included.
User Tip: Group Names will help you identify a group of individuals to search for later. Examples of Group Names are Summer 2018 Interns, Fall 2018 Class, etc. Group Name is not required; if you do not provide one, the Group Name will be automatically set to the current date and time (ET).
The system will check for the file data format to be correct. It will then present you with a screen describing any errors that require correction (Figure 10). Note that you cannot upload the file until you have fixed the errors identified in the file.
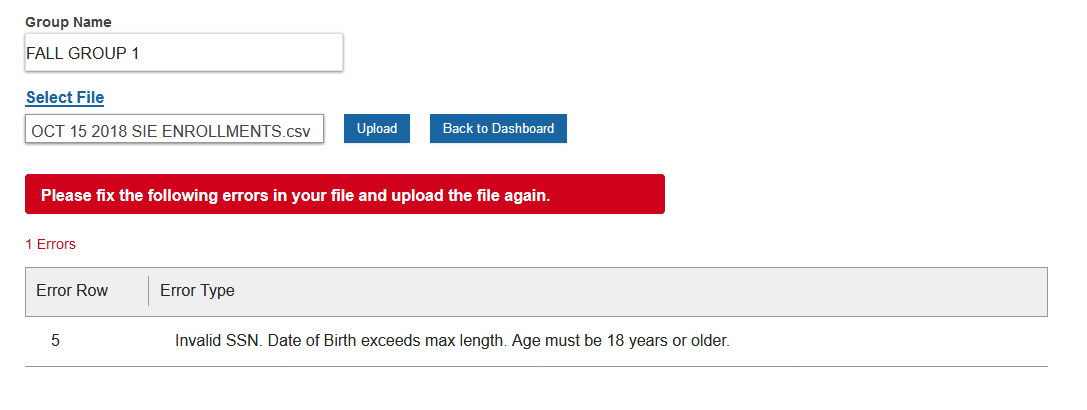
Figure 10
User Tip: If you encounter the error page depicted in Figure 9, pay attention to the Error Row, which points you to the row in the CSV file that must be fixed. Review the error type and correct it. You can also remove the offending row from the CSV and click on upload again.
After you resolve the formatting errors, upload the error-free file by selecting the Upload button.
Step 6: Complete Purchase
When you click the Upload button, the system will validate that each individual meets the Eligibility Criteria to take the SIE.
The eligibility validation process will ensure that you are not enrolling individuals who do not meet the eligibility criteria. If there are any individuals who are ineligible to enroll for SIE, the system will display each individual and the reason why they are ineligible (Figure 11).
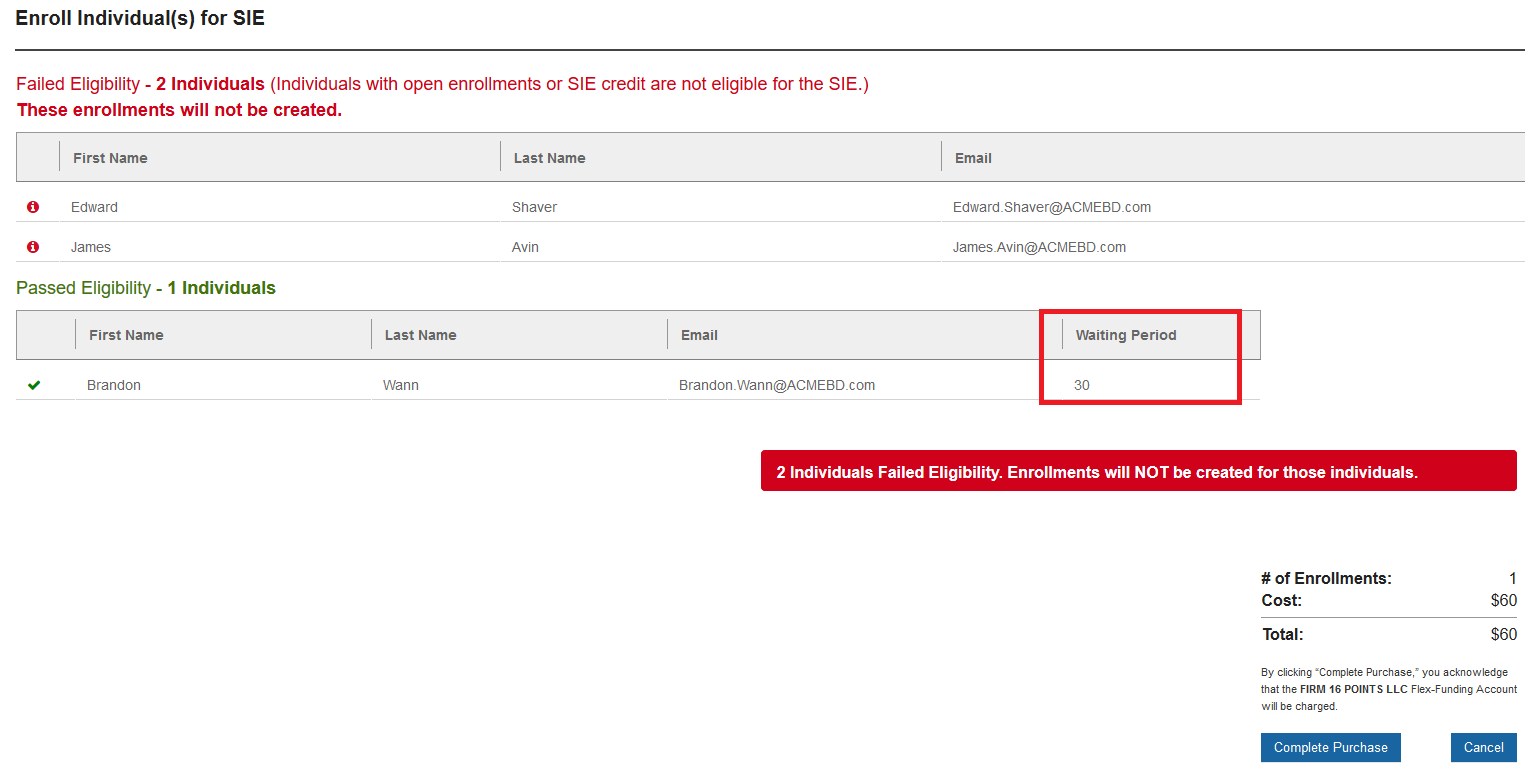
Figure 11
User Tip: Hover your mouse on the
![]()
character to get information on why the eligibility check for an individual failed. Individuals fail the eligibility checks based on their SIE eligibility status. You do not need to clear these errors; proceed with remaining individuals who passed the eligibility checks.
Verify the information presented in Figure 11 , and select Complete Purchase to create enrollments for the eligible individuals. If you believe some corrections are required, select the Cancel button and start the process over by uploading the corrected file.
If an individual failed the exam within the last 30 days, a 30-day waiting period will be applied based on the prior exam date. If you do not wish to enroll an individual with a waiting period, select Cancel and remove the individual from the CSV file. For additional information on waiting periods, please refer to the After Your Exam page on the FINRA website.
Note that the total dollar amount shown will be deducted from your firm's Flex-Funding account.
Step 7: Download Enrollments Report
The system displays the newly created enrollments and allows you to download them into a CSV (Figure 12).
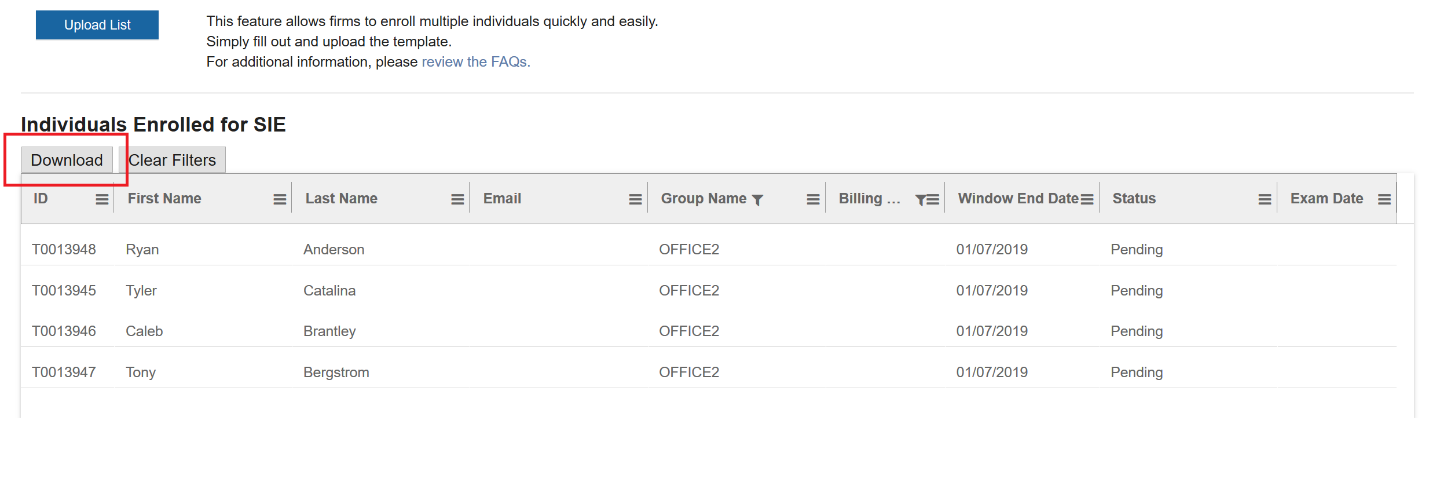
Figure 12
Each individual is assigned a T-ID or a U-ID depending on whether the individual purchased enrollments in the past. This T-ID or U-ID is a unique identification number and is required along with the individual’s first and last name to schedule an exam appointment at Prometric.com. Please provide this ID to the individual so they can schedule their appointment.
User Tip: If you include the individual’s email address in the CSV file, the system automatically sends them a notice of enrollment with all the required information to schedule an exam appointment. If you prefer to manage the appointment scheduling yourself, set the email address for each individual in the CSV to your registration department’s email address. By doing so, the firm will receive the notification email instead of the individual.
Enroll Individuals via Manually Add
The Manually Add feature allows you to enroll up to 100 individuals by manually entering the Required Enrollment Information for each individual on the screen. The following step-by-step instructions will guide you through this process.
Step 1: Select the Individuals Tab
At the top of the screen shown in Figure 13, select the “Individuals” tab to access and perform individual-related functions.
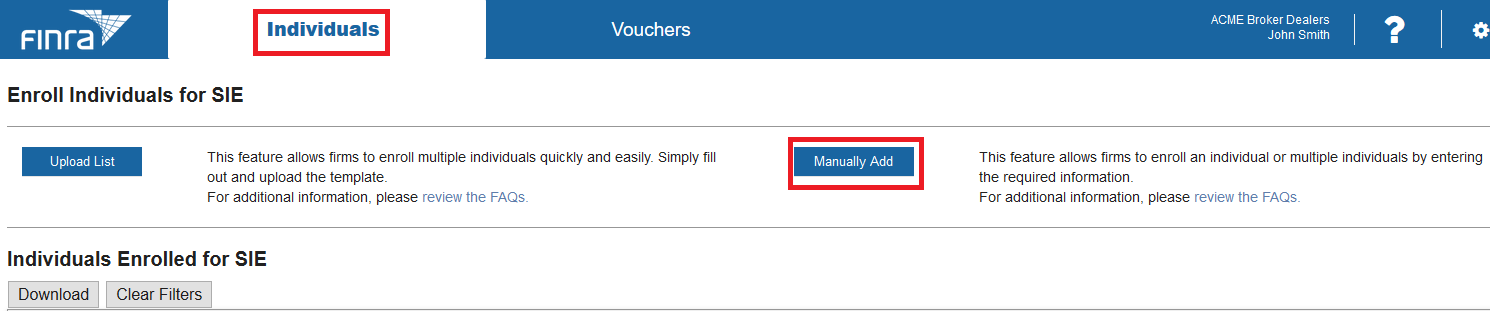
Figure 13
Step 2: Select Manually Add
Selecting the Manually Add button takes you to the page (Figure 14) where you can enter the Required Enrollment Information for an individual.
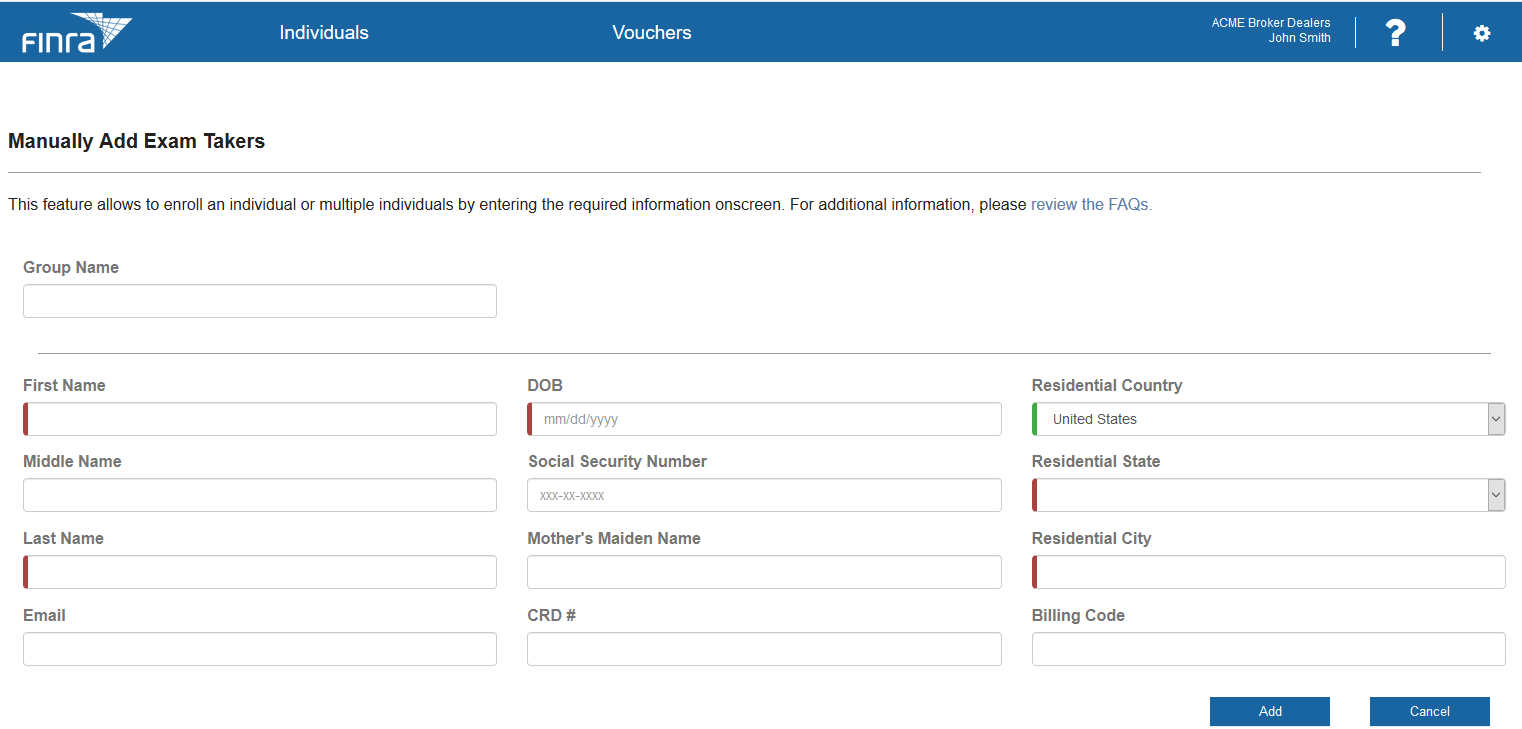
Figure 14
Step 3: Enter the Enrollment Information for an Individual
Enter the enrollment information for the first individual and select Add (Figure 15).
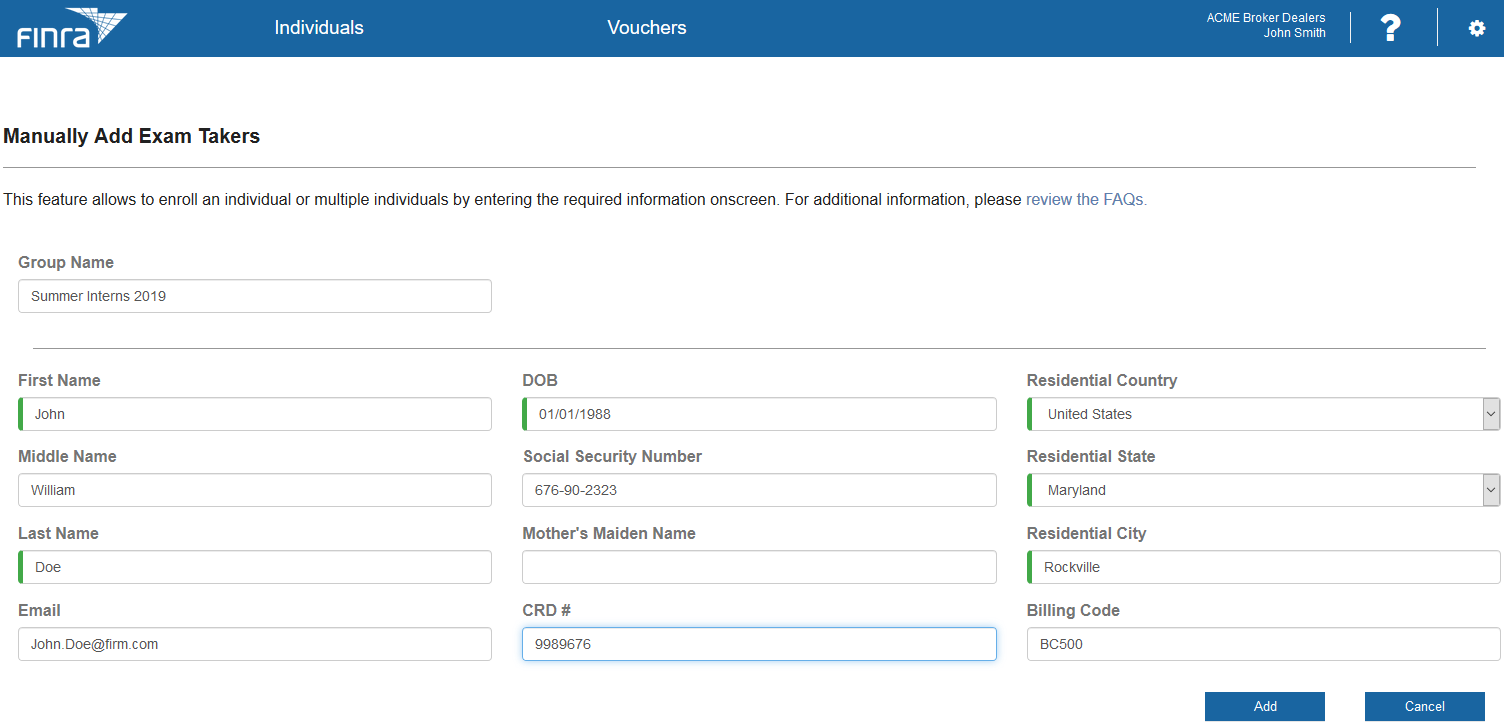
Figure 15
Individual is added to a table at the bottom of the screen (Figure 16).
Figure 16
User Tip: If the individual has an SSN, you are required to enter it during Manual Add. If the individual does not have an SSN, you are required to enter the individual’s Mother’s Maiden Name.
User Tip: Group Names will help you identify a group of individuals to search for later. Examples of Group Names are “Summer 2018 Interns,” “Fall 2018 Class,” etc. The Group Name is not required; if you do not provide one, the Group Name will be automatically set to the current date and time (ET).
Step 4: Continue adding individuals as desired
You can continue adding individuals (up to a maximum of 100) to the same transaction. The second individual added is shown in Figure 17 and Figure 18.
<
Figure 17
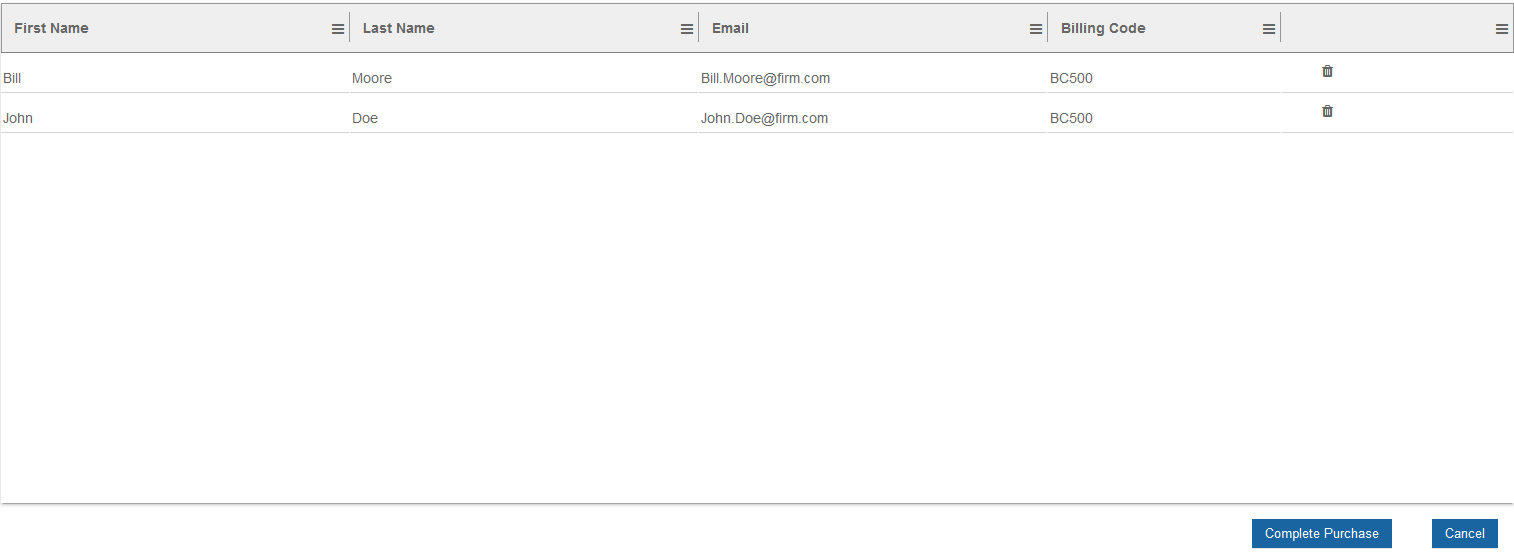
Figure 18
Step 5: Complete Purchase
When you click the Complete Purchase button, the system will validate that each individual meets the Eligibility Criteria to take the SIE.
The eligibility validation process will ensure that you are not enrolling individuals who do not meet the eligibility criteria. If there are any individuals who are ineligible to enroll for SIE, the system will display each individual and the reason why they are ineligible (Figure 19).
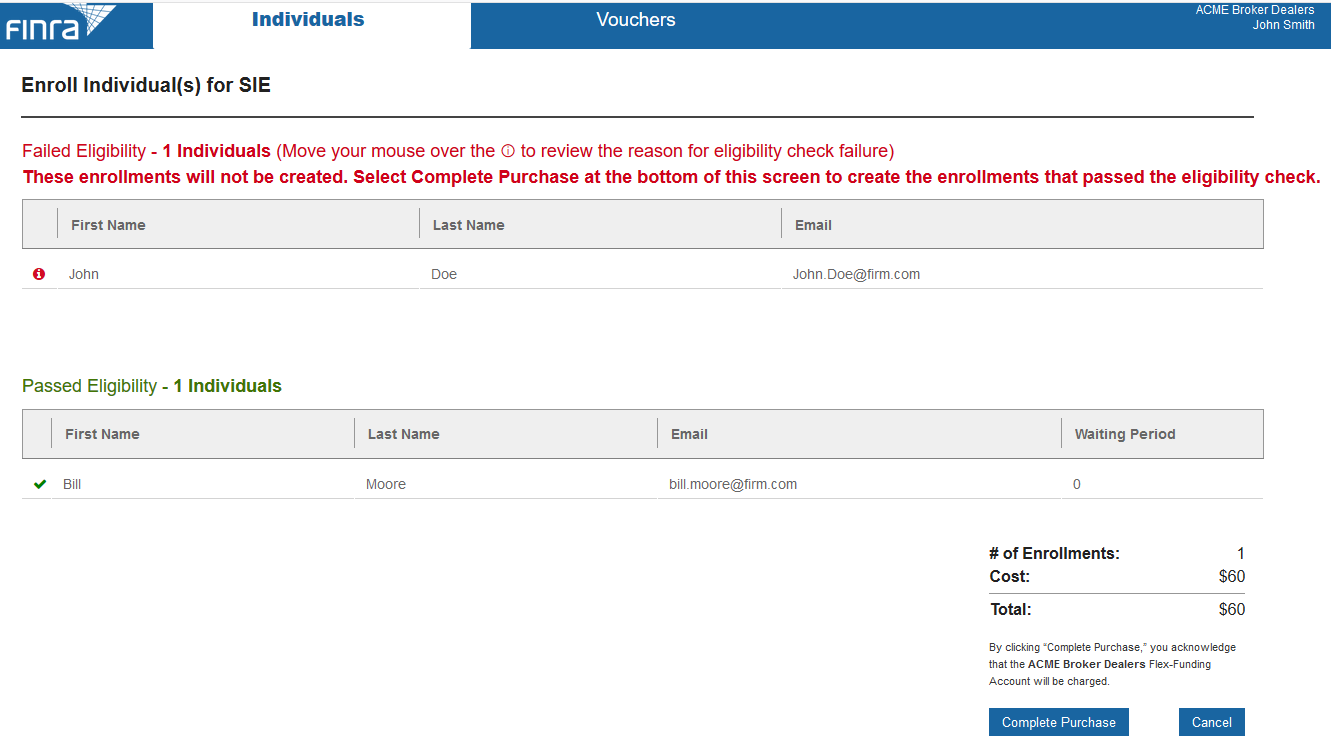
Figure 19
User Tip: Hover your mouse on the ![]() character to get information on why the eligibility check for an individual has failed. Individuals fail the eligibility checks based on their SIE eligibility status. You do not need to clear these errors; proceed with remaining individuals who passed the eligibility checks.
character to get information on why the eligibility check for an individual has failed. Individuals fail the eligibility checks based on their SIE eligibility status. You do not need to clear these errors; proceed with remaining individuals who passed the eligibility checks.
Verify the information presented in Figure 19, and select Complete Purchase to create enrollments for the eligible individuals. If you believe some corrections are required, select Cancel and start the process of manually adding individuals again.
If an individual failed the exam within the last 30 days, a 30-day waiting period will be applied based on the prior exam date. For additional information on waiting periods, please refer to the Test Results on the Exam Day page.
Note that the total dollar amount shown will be deducted from your firm’s Flex-Funding account.
Step 6: Download Enrollments Report
The system displays the newly created enrollments and allows you to download them into a CSV file (Figure 20). Sample downloaded reports look like the one shown in Figure 21.
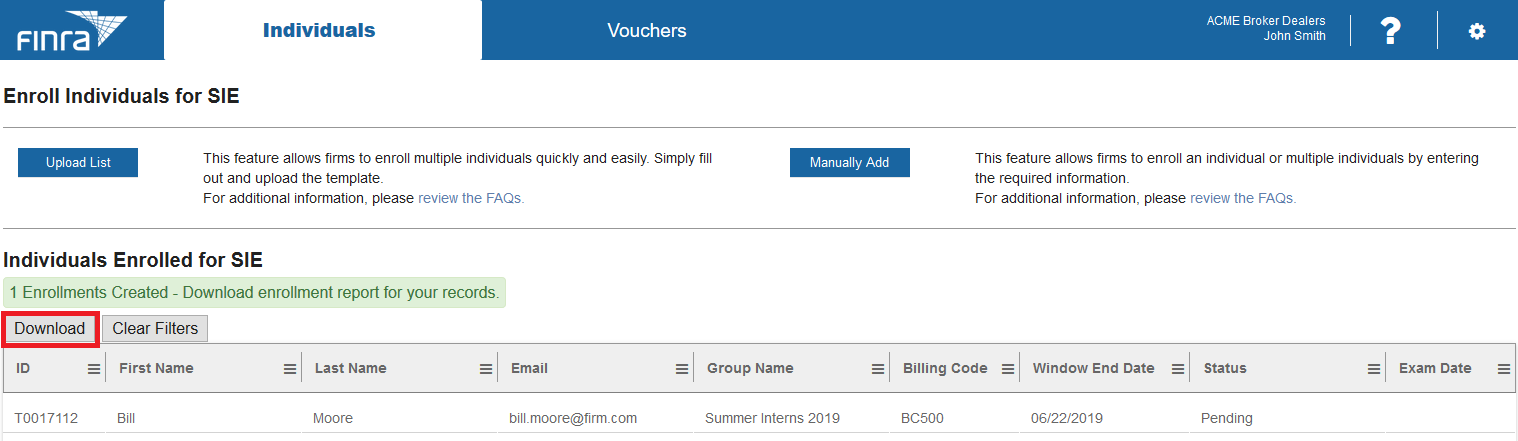
Figure 20

Figure 21
Each individual is assigned a T-ID or a U-ID depending on whether the individual purchased enrollments in the past. This T-ID or U-ID is a unique identification number and is required along with the individual’s first and last name to schedule an exam appointment at Prometric.com. Please provide this ID to the individual so they can schedule their appointment.
User Tip: If you include the individual’s email address during the enrollment process, the system automatically sends them a notice of enrollment with all the required information to schedule an exam appointment. If you prefer to manage the appointment scheduling yourself, set the email address for each individual you are adding via Manual Add to your registration department’s email address. By doing so, the firm will receive the notification email instead of the individual.
Purchase Vouchers
The second option available to firms is to purchase SIE vouchers. Vouchers allow individuals to self-enroll for the SIE within six months from the date of purchase. Once the individual self-enrolls, the voucher is considered redeemed, and a 120-day exam enrollment window will be created. The enrollment window provides the individual time within which to schedule and take the exam.
Step 1: Select Voucher Tab
To purchase a voucher, select the Vouchers tab at the top of the screen and then select the Purchase Vouchers option (Figure 22).

Figure 22
Step 2: Input Voucher Quantity and Complete Purchase
On the Purchase Vouchers screen below (Figure 23), input the Quantity, optional Billing Code and optional Group Name, then select Complete Purchase to purchase the vouchers. Note: You are permitted to purchase up to 100 vouchers per transaction. There is no limit on the total number of transactions that a firm is permitted to make as long as you buy no more than 100 vouchers at a time.
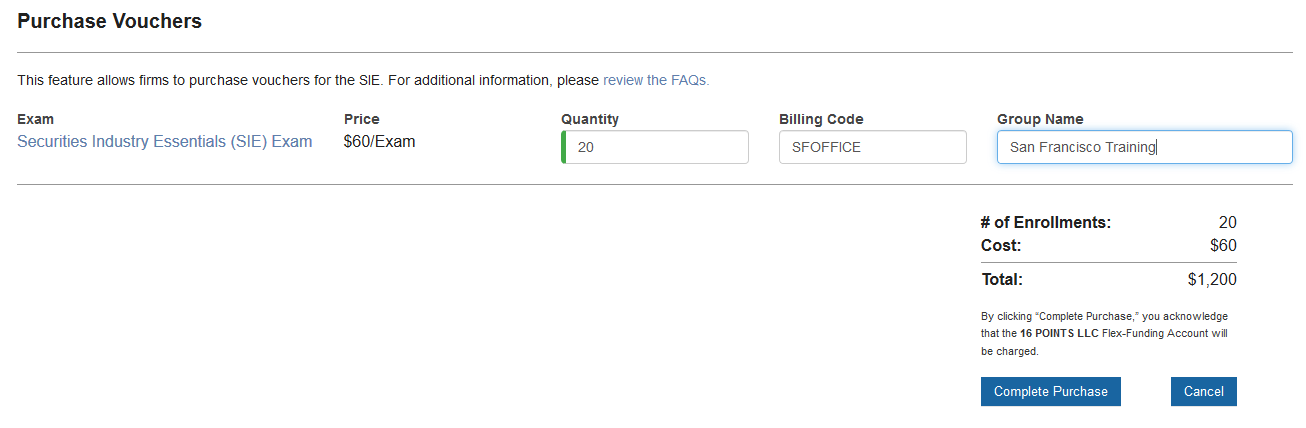
Figure 23
Step 3: View Vouchers Purchased
After the purchase is complete, the system redirects you to the main vouchers page (Figure 24) where you can view how many vouchers are available and how many have been redeemed.
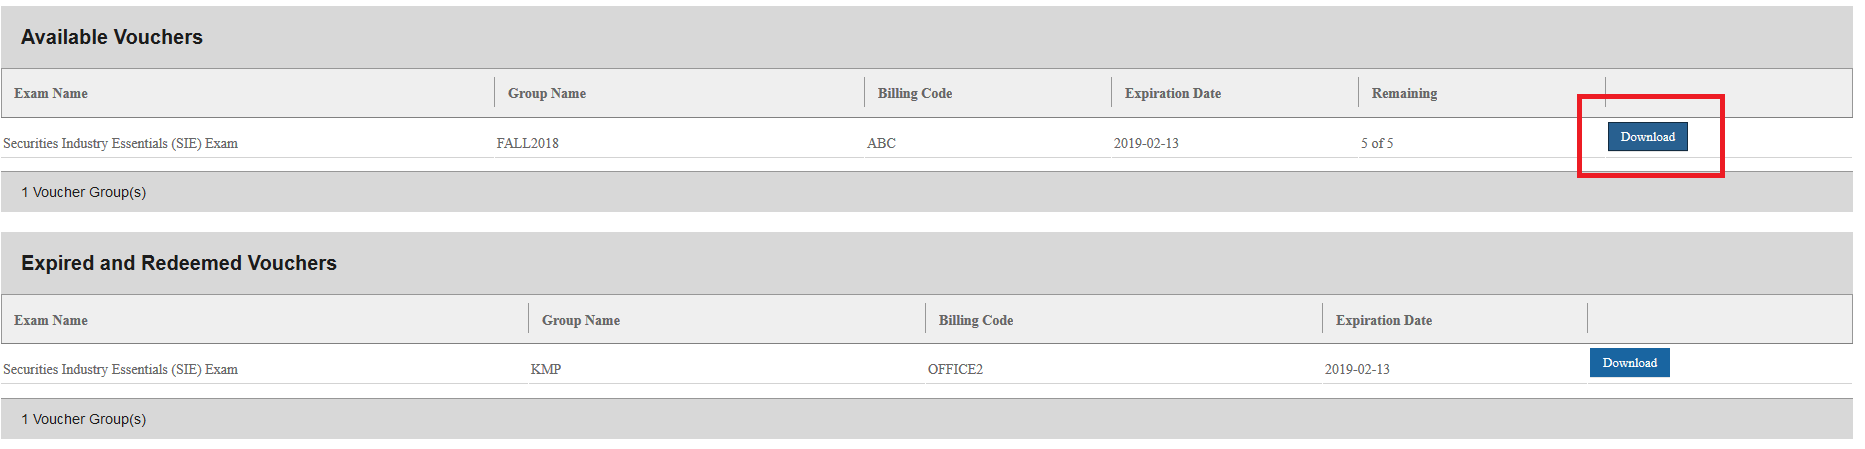
Figure 24
User Tip: Vouchers purchased will expire six months after purchase. The vouchers must be redeemed prior to the Expiration Date displayed on the screen. If vouchers expire, you forfeit those vouchers. You will not get a refund for unused vouchers.
Step 4: Voucher Usage
In the Available Vouchers table on Figure 24, each row has a Download button. Select this button to download the voucher codes. A CSV file will be downloaded that can typically be opened with Microsoft Excel or any text editor such as Notepad (Figure 25).

Figure 25
The first column in the file is the voucher code. The voucher code is a unique, 12-character, alphanumeric code. Please note that the there are no vowels in this character string. Find a voucher code that is not redeemed (redeemed column value is N), and provide it to an individual you want to enroll for the SIE. The voucher code is good for six months from the date of purchase. Once the individual redeems a voucher, a 120-day exam enrollment window will open for them. The individual must schedule and take the exam within this time period.
Below is a sample email for sending a voucher code to an individual via email:
TO: Individual Name
Subject: SIE Voucher Code
Dear Individual,
Here is the voucher code that you will use to enroll for the SIE Exam: 39BZ-SW3J-PRBH.
Please navigate to https://finra.org/enroll-for-sie and select the link to enroll for SIE. After you create a profile and login, select the SIE exam, enter the voucher code, select Apply and select Continue. If you did not select Apply, the system will take you to a payment page where you will be required to pay for the exam through credit card or a bank account.
After you enroll for the SIE, you will receive an enrollment confirmation email from FINRA that includes instructions for scheduling your appointment.
Compliance and Registration
Broker-dealer ABC
User Tip: Ensure that you assign the voucher code to the right individual. The system cannot track who the voucher was given to until an individual redeems it. Once the voucher is redeemed, the purchaser can see who has used it. It is the purchaser’s responsibility to keep track of who they are giving out the vouchers to. Once redeemed, a voucher code will have no further value, even if the individual who redeemed it never takes the test. Redeemed voucher codes are not transferable and nonrefundable.
Dashboards
Two dashboards are available to you through the system. The Individual dashboard allows you to monitor the individual enrollments sponsored by your firm. The Voucher dashboard allows you to monitor the vouchers purchased and their redemption status.
Individual Dashboard
You can access the Individual dashboard by selecting the Individuals tab at the top of the page. In the Individual dashboard (Figure 26), you can view every individual whose SIE enrollment was paid for by the firm through the non-Form U4 enrollment process. The individuals who redeemed the vouchers are also included in this view.

Figure 26
The table columns allow you to sort the table or search for a specific value by filtering. To filter, select the ![]() icon. This will display several search criteria such as Equals, Contains, Starts with, Ends with, etc. The Clear Filter button clears the filters you entered and restores the default view of all enrollments. The Download button allows you to download the current view of the table.
icon. This will display several search criteria such as Equals, Contains, Starts with, Ends with, etc. The Clear Filter button clears the filters you entered and restores the default view of all enrollments. The Download button allows you to download the current view of the table.
User Tip: The Status and the Exam Date columns on the dashboard will allow you to monitor the life cycle of an enrollment (Figure 27). After an individual has taken the SIE exam, the Status column will update to either Pass or Fail with score. (Scores are included only if the individual fails the exam.) The Exam Date column will show the scheduled appointment date.
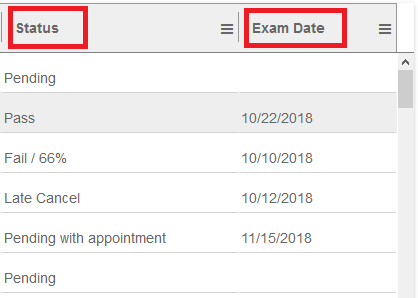
Figure 27
Voucher Dashboard
You can access the voucher dashboard by selecting the Vouchers tab at the top of the page. In the voucher dashboard shown below the Purchase Vouchers section, you can view the Available Vouchers and the Expired and Redeemed Vouchers (Figure 28).
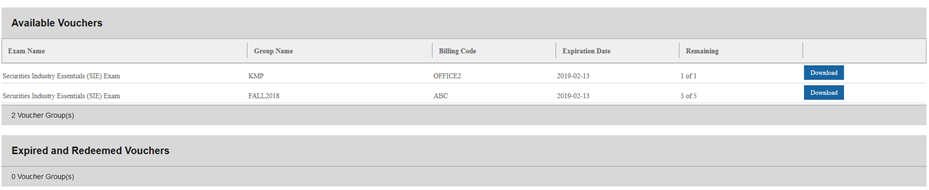
Figure 28
You can download the available vouchers and assign them to the sponsored individuals by providing them with the voucher code.
The Expired and Redeemed Vouchers section displays the vouchers that you cannot use anymore because they are older than six months or an individual has redeemed them.
Required Enrollment Information
When requesting an SIE enrollment for an individual, review the table below to ensure that you are providing all the “Required” enrollment information.
| Column | Required/Optional | Description |
|---|---|---|
| First Name | Required | Individual's first name |
| Middle Name | Optional | Individual's middle name |
| Last Name | Required | Individual's last name |
| Email Address | Optional | Individual's email address |
| Date of Birth | Required | Individual's date of birth Valid date format: MM/DD/YYYY |
| Social Security Number (SSN) | Required | Individual's SSN |
| Mother's Maiden Name (MMN) | Required if no SSN | Individual's MMN |
| CRD Number | Optional | Individual's CRD number |
| City | Required | Individual's residential |
| State | Optional | Individual's residential state |
| Country | Required | Individual's residential country |
| Billing Code | Optional | Billing code Maximum of 8 characters The Billing Code is an optional field that firms can use as applicable to their firm's internal work processes. |
Note: Commas are not allowed in any of the values entered for any of the columns because comma is the field separator. For example, last name such as Smith, Jr. is not allowed as it contains a comma.
Enrollment Life Cycle
Enrollments for the SIE will be assigned an initial status of “Pending.” The status is updated depending upon what occurs throughout the enrollment life cycle. For example:
- Individual passes the exam:
Enrollment Opened (Pending) → Appointment Scheduled (Pending with Appointment) → Exam Taken (Passed) - Individual fails the exam:
Enrollment Opened (Pending) → Appointment Scheduled (Pending with Appointment) → Exam Taken (Failed/64%) - Individual does not appear for the exam:
Enrollment Opened (Pending) → Appointment Scheduled (Pending with Appointment) → No Show - Individual canceled the appointment within two business days of the exam:
Enrollment Opened (Pending) → Appointment Scheduled (Pending with Appointment) → Late Cancel
The following table shows the different enrollment statuses and definitions:
| Enrollment Status | Description |
|---|---|
| Pending | Enrollment created and individual yet to schedule an appointment with Prometric |
| Pending with Appointment | Exam scheduled |
| Late Cancel | Closed – Canceled the appointment within two days of scheduled date |
| No Show | Closed – Did not appear for scheduled appointment or unable to test |
| Expired | Closed – 120-day enrollment window expired |
| Blocked | On hold by FINRA. Contact the FINRA Support Center at (301) 869-6699 |
| Closed Administrative | Request denied |
| Approval Needed | Pending FINRA review and approval |
| Completed | Individual previously sponsored by you who failed the exam has subsequently passed it |
Additional Information
If you need additional information or have questions, please contact the FINRA Support Center at (301) 869-6699.
If the individual you are enrolling for the SIE exam requires testing accommodations, please visit FINRA’s testing accommodations page.